Paddy Whack – a traditional Irish fiddle tune arranged for the guitar

And a Happy Saint Patrick’s Day to you all!
Here is a relatively simple guitar arrangement of “Paddy Whack,” a traditional Irish fiddle tune. It’s not too difficult to play, not to mention a lot of fun! Plus, once you have gotten the song into your fingers, it’s fairly easy to get to the point where you can play it fairly quickly. You’ll hopefully be pleasantly surprised at how cool it sounds. If you want, skip ahead to the final MP3 example and give it a listen to familiarize yourself with the tune before we start.
“Paddy Whack” essentially breaks down into a single melody line (played in 6/8 time) that is accompanied by a single bass note that usually changes every three beats. The song can be further broken down into an “A” section (the first eight measures) and a “B” section (the final eight measures). While it may seem like there’s a lot going on between the busy melody and the steady bass, playing it well is simply a matter of being focused on the chords implied by the two distinct parts. Even though you don’t have to form any full chords to play “Paddy Whack,” keeping those chords firmly in mind will make both learning and playing the song an easy task.
The First Four Measures
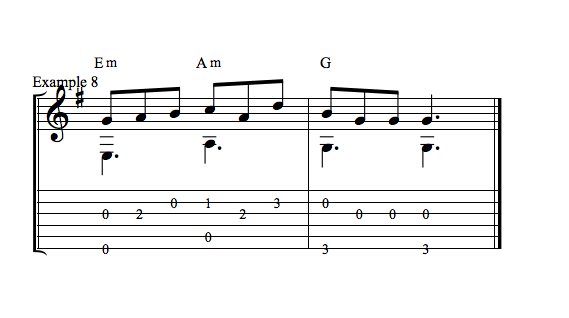
Let’s take a look at the first two measures of “Paddy Whack,” as well as the chords implied by the melody line and bass notes:
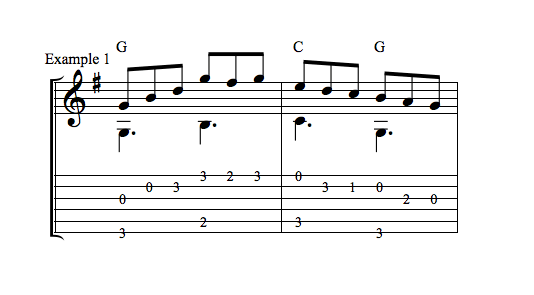
Your basic open position G chord sets up everything for the first measure, especially if you play your G using your middle finger at the third fret of the low E string and your first finger on the second fret of the A string. Don’t worry about any other fingers to start with. Form just this much of the G chord and then pinch the low E (middle finger on the third fret) and the open G string and then pick the open B string. Then use either your ring finger or your pinky to play the D note at the third fret of the B string. You can do this as a hammer-on if you’d like, but be sure to keep the timing of each of the first three notes even.
Next, use either your ring finger or your pinky to play the G note at the third fret of the high E string while (on the same beat) pinching the A string, where your index finger is sitting on the second fret. Ideally, you want to use whichever finger you didn’t use on the B string for the note on the high E string, but some of you may find it easier (especially at the slow speed used in the audio) to play both notes with the ring finger instead of getting the pinky involved. Either way, this leaves your middle finger free to handle the F# note at the second fret of the high E string.
If you begin the second measure by forming a full open position C chord, you’ll find that you just need to add your little finger to the third fret of the B string to get that second note and then simply pick it up again because your index finger is already set for the note that follows on the first fret.
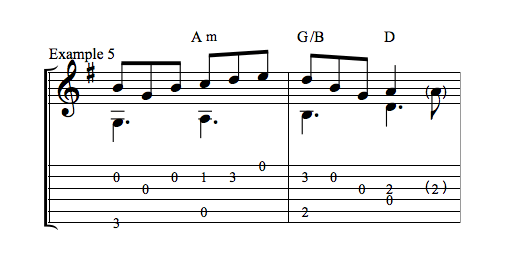
The next two measures are even easier:
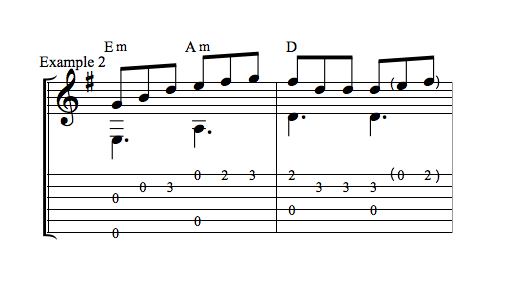
The third measure is practically a repeat of the first – the melody notes are identical while the bass note is the open low E string. Try to use your ring finger to play the D note at the third fret of the B string. Also, try to keep it there while playing the next three melody notes on the high E string by using your middle finger for the second fret and your pinky on the third fret. By doing so, you’re perfectly set for the open position D chord that occupies virtually all of measure four.
The Second Four Measures
In the first measure of “Example 3” you get a bit of a fingering choice. Also please note that in the audio example, the last two notes of “Example 2” (the ones in parenthesis) start the musical phrase:
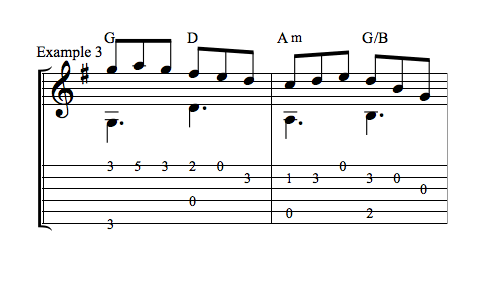
How you decide to play the first set of pinched notes, the G notes at the third fret of both the high and low E string, is very much a matter of your own comfort and confidence. Most guitarists would tend to barre their index finger across all six strings for the pinch and then use either the ring or pinky to get the A note at the fifth fret of the high E.
But it’s also possible to fret the first pair by using the index finger at the third fret of the low E string and the middle finger (sliding up from its place for the open positing D chord) at the third fret of the high E string. Doing so means you’ll most likely find the pinky the easiest way to reach that A on the fifth fret.
The second measure of this example demonstrates again the advantage of keeping fingers in place on the fretboard. When playing the first two melody notes on the B string, you’re most likely to use your index finger on the first fret and your ring finger on the third fret before hitting the open high E string. Do yourself a favor and keep the ring finger right in place since you’ll be playing that note again immediately after hitting the open high E string. Having your ring finger serve as an anchor will also make it easier to simply place your index finger down at the second fret of the A string to get that bass note.
And this technique of staying in place pops up again in the next two measures, which finish off the “A” section of the song:
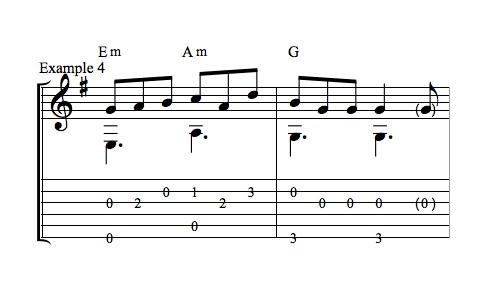
This time it’s the middle finger you want to anchor you in place. Once you set it at the second fret of the G string, keep it there until the start of the last measure. This will mean using your index finger on the first fret of the B string and either your pinky or your ring finger for the third fret.
Once you’ve gotten this far through “Paddy Whack,” take the time to repeat it in order to get the basic movements into your fingers. As mentioned earlier, the song’s “B” section is very similar (in fact, the last two measures are exactly the same as “Example 4”), so you should find yourself learning the last eight measures more quickly than the “A” section.
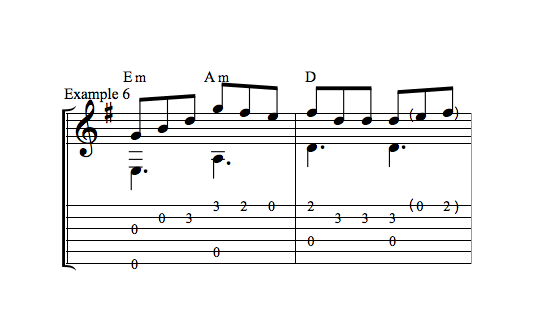
The Next Four Measures
The trickiest aspect of the next two measures is the variation of the melody, which includes an immediate reversal of direction as well as a quarter note, which needs to be held for two beats since we’re in 6/8 timing:
Here we start with the open B string as our melody note, followed by the open G and then the open B again. This is certainly not hard to do, but since it’s the first time playing it don’t be surprised if it takes you a try (or two) (or more!) to get it right. Be patient and it will become second nature.
Likewise, the last note of this phrase (the A at the second fret of the G string) is held for an additional beat compared to the others you’ve been playing for most of the melody. Your first instinct might be to rush through it so take a moment now to get the timing correct so you won’t be wondering how you managed to get off the beat later!
The next two measures of “Paddy Whack” are almost identical to those in “Example 2” except for the melody of second half of the first measure is descending instead of ascending:
Again, this really shouldn’t pose any problem for you at this point, provided that you simply pay attention to it.
The Last Four Measures
The first half of the last four measures is the most challenging part of the whole song:
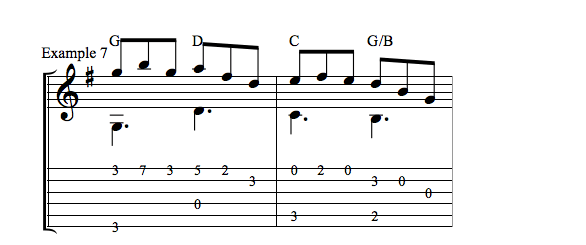
Barring across all six strings at the third fret is pretty much the easiest way to play the first three notes of the first measure here. Your pinky would then get the B note all the way up at the seventh fret of the high E string and simply remove it again to get the following G at the third fret. Using your pinky once again to get the A note at the fifth fret of the high A string sets you up to use your index finger for the F# note at the second fret and then either your middle or ring finger to get the D note at the third fret of the B string.
But don’t pat yourself on the back too quickly because you’ve now got to set up a C chord (actually just the ring finger on the third fret of the A string for the bass note) , not to mention catching the F# melody (at the second fret of the high E string) again. Believe it or not, your middle finger is the best choice here because that will free up both your index finger (for the second fret of the A string) and ring finger (for the third fret of the B string) for the next chord shift.
These two measure involve quite a bit of “finger acrobatics,” so please take your time to work through them without worry about the rhythm. First make sure you know how you want your fingers to move from position to position and try to make the moves as smoothly and as fluidly as possible.
It’s possible, though, that you may not be able to make the initial stretch from the third fret to the seventh fret required by the melody in the first measure of “Example 7.” Not to worry! Here are two alternate ways to go:
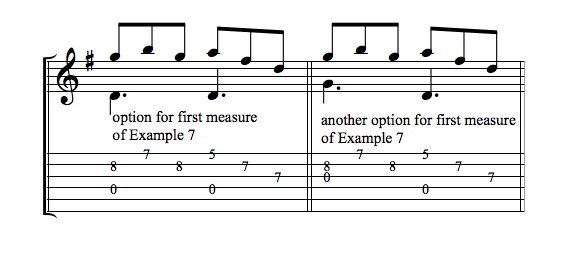
For both of these options, you want to form a D shape at the seventh and eighth frets of your guitar. The first option uses the open D string for both your bass notes and you may find this perfectly acceptable. But you may not. And that’s why the second option shifts from using the open G as the bass for the first three melody notes to the open D string for the second set of melody notes.
Finally, as mentioned earlier, the last two measure of “Paddy Whack” are note for note the same as those in “Example 4.” It’s a welcome after dealing with “Example 7,” The first half of the last four measures is the most challenging part of the whole song:
This is certainly a welcome respite after dealing with “Example 7,” right? Anyway, here’s a complete take of the entire song:
Download a PDF of the complete arrangement
A couple of other things to note: Most traditional fiddle tunes are divided into “A” and “B” sections. Also, it’s typical for each section of these tunes to be repeated. So you’d play the “A” section twice and then the “B” section twice. It certainly makes the song a little longer so you can enjoy it more!
You also want to keep in mind that you are free to use hammer-ons, pull-offs, or other guitar techniques to make the song have more of a A Celtic Air to it. Anytime that your melody note is changing from an open string to a fretted note on the same string, try a hammer-on. Likewise, anytime that the melody descends from a fretted note to the open string that you fretted for the first note, see if you like how a pull-off sounds to create the second note.
You could even go for a combination hammer-on and pull-off. For instance, in the first measure of “Example 6” you could replace the single F# note at the second fret of the high E string (the fifth note of the melody in that measure) with a quick trill – start with the F# note and (keeping a finger on that note) quickly hammer onto the third fret of the high E string and then immediately pull-off to get back to the original F# and then pull-off again to get the open E string that closes the measure. You’ll find all sorts of fun ways to make “Paddy Whack” even more entertaining than it already is.
As always, I hope you’ve enjoyed this lesson. I look forward to chatting with you again in the very near future.
Peace
Allison aka Violet
May 30th, 2016 @ 3:56 pm
Thanks so much David :)